With my colleague (from InGo) we are building new small startup which will help (we hope) to people to solve “problem of 1000 tabs opened” (usually to read them later).
Our server are built with node.js express application and for CI we are using Jenkins. This post is about how we make Jenkins understand node.js test tools results.
First I have installed some plugins:
- AnsiColor - this one to have a nicer console output when it is available
- Jenkins Cobertura Plugin - code coverage
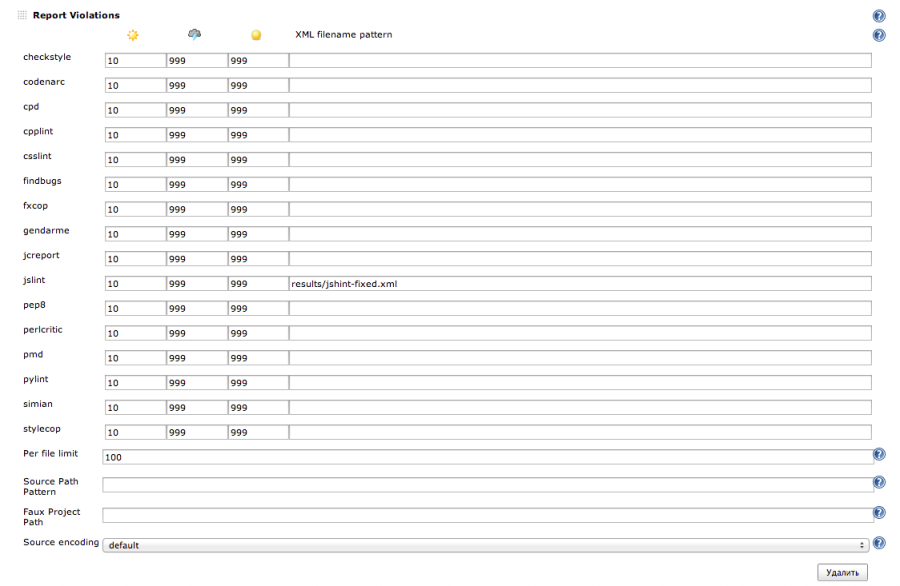
- Checkstyle plugin - better one for jshint
or Violations plugin - xUnit plugin or JUnit plugin - test’s results (they uses similar xml files)
How I manage versions of tools
First jenkins pull all sources from repository. Then first build step, make npm install and I have all my dependencies installed (dev too).
In package.json in devDependencies I have all tools that need to run tests, get metrics and so on.
I think it is required to point: with node.js in current state there is no right way, but there is the most convenient way for me in our project at current state. So if I will found something more convenient I will switch to that way.
To do not spend time each time to edit jenkins job I created Makefile and added tasks to it.
Test results with xUnit plugin
For tests we are using mocha and should.js (and supertest for http requests). This is a job to get xUnit compatible xml:
test-jenkins-xunit: @NODE_ENV=test ./node_modules/.bin/mocha \
    --recursive \
    --check-leaks \
    --reporter xunit \
    $(MOCHA_OPTS) 1> results/xunit.xml
In build steps I add shell script step:
make test-jenkins-xunit And in post build steps:

JsHint warnings/erros with Checkstyle plugin
After jshint 2.X.X was released behaviour of default reporters was changes. In previous version –show-non-errors makes in output xml (with checkstyle reporter) show not used variables and globals as warnings. Now it uses own reporter. To return old results I fill simple checkstyle reporter with old and new code.
Makefile task:
jshint-jenkins:
    ./node_modules/.bin/jshint --reporter=checkstyle-reporter.js $(JS) 1> results/checkstyle.xml
Now need to run this task at shell step and point Checkstyle plugin to file with results:

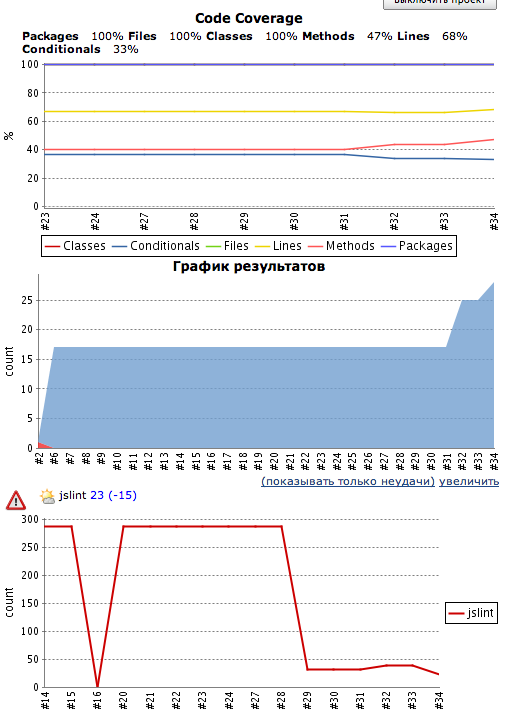
And now we see nice and convenient chart in our job:

JsHint warnings/errors with Violations plugin
This section outdated (I prefer Checkstyle plugin) but if you want to use Violations plugin.
First again Makefile task:
test-jenkins-jslint:
    ./node_modules/.bin/jshint $(JS) --jslint-reporter 1> results/jshint.xml || exit 0
And how to use it in jenkins build step:
make test-jenkins-xunit I added ‘exit 0’ because it return 1 if anything found and build step will fail.
Exists one problem with Violations plugin and xml that produced by jshint. Because it uses relative path you cannot see in job report where actual problem is. I saw several posts about it and nobody publish solution. After previous build step i have added new one that fix xml:
sed -E "s?<file name=\"(.*)\?\">?<file name=\"$WORKSPACE/\1\">?" results/jshint.xml > results/jshint-fixed.xmlThis will replace relative paths in name attribute to absolute that Violations Plugin can handle.
Now after build step:
Code coverage with Cobertura plugin
Makefile task:
test-jenkins-cov:
    @NODE_ENV=test ./node_modules/.bin/istanbul cover --report cobertura --dir
        ./results ./node_modules/.bin/_mocha -- \
        --recursive \
        --check-leaks \
        --reporter $(REPORTER) \
        $(MOCHA_OPTS)
Build step is very simple:
make test-jenkins-covLast thing after build step:

Now I press ‘Save’ and run this job to see reports (I hope You don’t forget to add repository to this job). Click on job name:
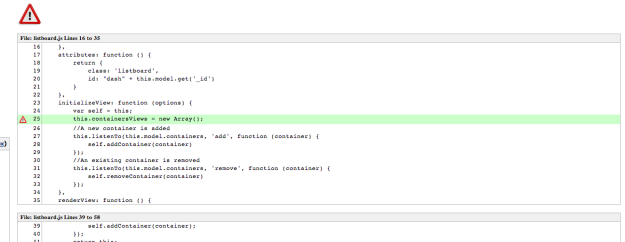
When I click on any of this charts i can see more detailed report. This one from Violations Plugin that you can see when click on file in report (and you will not see this if you do not fix problem with relational paths).
That is all! I hope this post will help to somebody. I decide to write it because there is no similar post that describe whole process.
Hi Denis, I strongly recommend having a look at jenkins nodejs plugin (https://wiki.jenkins-ci.org/display/JENKINS/NodeJS+Plugin).. V0.2 I've released recently brings support to node installers alongside npm packages installers
ReplyDeleteHope you'll find it useful
Hi, Frédéric. Thanks for response.
DeleteI already saw this plugin. It is useful for some cases, but i prefer to manage server with other tools.
This plugin does not help me to get required metrics data, it only solve problem how to run javascript in jenkins step.
How do you handle provisioning of ./node_modules/.bin/ folder you reference on every step?
ReplyDeleteDo you check the file hierarchy in?
This point is missing in your explanation.
It is taken from current project (which in devDependencies contains required versions). First step in jenkins make npm install.
DeleteI think you are right, need to add this in this article.
DeleteSo you're assuming node & npm are intalled on your jenkins slave/master running your job.
DeleteNode installer (available in nodejs plugin v0.2) will avoid this burden : you pick the node version you want, and jenkins will install it when needed (ie not already installed on a slave/master requiring it during a job execution)
Another advantage of this is you can have several node versions living together, and choose the right one on a per job basis.
Another thing you might be interested in, is the possibility to globally install npm package with node installer.
In you current design, you don't need it because you define your requirements in package.json's devDependencies.
But this implies some drawbacks :
- Each project has to define its own tooling dependencies (this could be seen as a good point too : allowing to use specific versions on a per-project basis)
- Everytime you execute your job, you spend time downloading the internet by provisioning your tooling devDependencies (which shouldn't change really often once defined to my POV)
- If you have several jobs for the same project, or different projects using the same tools, there are good chances you will spend this same time, and fill your disk with same artefacts, whereas it could be shared
This is where the global npm packages installation could be handy : you can define some global npm packages installed alongside your npm installation :
- These npm packages can be provided to the PATH during your job execution
- You can fix versions for these npm packages (see doc of the plugin)
- In that way, you can share your tools among your different jobs, and spend `npm install` installation time only once (or regularly, see the "cache hours refresh rate" option) instead of everytime.
Yes, agree. Right points.
DeleteThanks.